One of the features I’ve been taking a look at in the Ubuntu Kinetic cycle is getting as many different display types working out of the box (or as nearly out of the box as is reasonable) on Ubuntu. The official Raspberry Pi touch display is still a work in progress (it’s working with the FKMS overlay, but that’s not sustainable for the future, and there’s still issues using it with KMS under Ubuntu).
There’s some interesting e-Ink displays which I’m also working on, but this post is about Pimoroni’s awesome little Hyperpixel range of displays.
Pinhead hasn’t quite understood “using all the pins”
In the beginning
In which Dave, yet again, buries the lede …
Some may be aware that the graphics stack on the Raspberry Pi has undergone some upheaval of late. For those not following along, things are quite rapidly (by the standards of these things) moving from the original (largely closed-source) stack to an open one.
In the old stack (referred to as “fkms” which, ever so slightly confusingly, means “fake” KMS) most graphical operations were handled by a closed-source firmware, running on the GPU which Linux interacted with via the VC4 “mailbox”. In the new stack (referred to as “full” KMS, but the “full” is definitely not “fake” so it’s just “kms” for short), the Linux kernel is in charge of stuff directly.
Ultimately the idea is that, without all the special cases sloshing around in closed-source blobs stuff should Just Work™. Naturally, the real world isn’t quite so simple but in the case of the Hyperpixel it really is pretty damned close to this. Or at least, it turned out to be considerably easier than I expected!
Darkness moving over the water
The nicest thing about the new stack is that the Hyperpixel can be treated as a regular display, and there are no extra dependencies. In other words, it can be made to work from first boot … sort of. We’ll get into the short-comings a bit further on, but for now here’s what you do to get going.
The Hyperpixel uses DPI (Display Parallel Interface) to receive its imagery. Unfortunately this requires a lot of pins. Nearly all the GPIO pins in fact.
The default Ubuntu configuration reserves some of the GPIO pins for interfaces like I²C, SPI, and serial UART. We need to disable all that so the display can use them instead:
We’ll start with a freshly flashed, unbooted card containing Ubuntu 22.10 (Kinetic). Either the desktop or the server version is fine.
Stick the card in another machine (running any OS) with an SD card reader so we can edit the configuration.
Open config.txt on the boot partition (which will be the only partition that shows up if you’re doing this on Mac OS X or Windows, or the one labelled “system-boot” otherwise)
Disable the I²C and SPI interfaces. This is simply a matter of deleting the following lines (or placing a “#” in front of them to comment them out):
dtparam=i2c_arm=on
dtparam=spi=on
If you are using the desktop image, skip to step 8.
Delete (or comment out) the line enabling the serial console. Again, this uses pins that the Hyperpixel needs:
enable_uart=1
Open cmdline.txt and remove console=serial0,115200 from the start of the line (you cannot comment out bits of the kernel command line, so just delete this bit). This is the only change required in cmdline.txt, so close it and switch back to config.txt.
Add the following line at the end of the file:
dtoverlay=vc4-kms-v3d
If you have a rectangular Hyperpixel display, add the following line at the end of the file:
dtoverlay=vc4-kms-dpi-hyperpixel4
If you have a square Hyperpixel display, add the following line instead:
dtoverlay=vc4-kms-dpi-hyperpixel4sq
If you need to rotate the display, add the appropriate parameters; the rotate parameter rotates the display clockwise, while the touchscreen parameters transpose or invert the coordinates reported by the touchscreen which allows you to configure an equivalent rotation:
- No rotation
For non-square Hyperpixel displays this will be a portrait orientation with the top of the display by the USB and Ethernet ports (if any). No extra configuration required.
- 90° rotation
For non-square Hyperpixel displays this will be a landscape orientation with the left of the display by the USB and Ethernet ports (if any). Add the following lines:
dtparam=rotate=90
dtparam=touchscreen-swapped-x-y,touchscreen-inverted-y
- 180° rotation
For non-square Hyperpixel displays this will be a portrait orientation with the bottom of the display by the USB and Ethernet ports (if any). Add the following lines:
dtparam=rotate=180
dtparam=touchscreen-inverted-x,touchscreen-inverted-y
- 270° rotation
For non-square Hyperpixel displays this will be a portrait orientation with the right of the display by the USB and Ethernet ports (if any). Add the following lines:
dtparam=rotate=270
dtparam=touchscreen-swapped-x-y,touchscreen-inverted-x
For example, if you started with an Ubuntu Server image, a rectangular Hyperpixel, and you want 180° rotation, you should wind up with a config.txt that looks like this:
config.txt
 1[all]
 2kernel=vmlinuz
 3cmdline=cmdline.txt
 4initramfs initrd.img followkernel
 5
 6[pi4]
 7max_framebuffers=2
 8arm_boost=1
 9
10[all]
11# Enable the audio output, I2C and SPI interfaces on the GPIO header. As these
12# parameters related to the base device-tree they must appear *before* any
13# other dtoverlay= specification
14dtparam=audio=on
15#dtparam=i2c_arm=on
16#dtparam=spi=on
17
18# Comment out the following line if the edges of the desktop appear outside
19# the edges of your display
20disable_overscan=1
21
22# If you have issues with audio, you may try uncommenting the following line
23# which forces the HDMI output into HDMI mode instead of DVI (which doesn't
24# support audio output)
25#hdmi_drive=2
26
27# Enable the serial pins
28#enable_uart=1
29
30# Autoload overlays for any recognized cameras or displays that are attached
31# to the CSI/DSI ports. Please note this is for libcamera support, *not* for
32# the legacy camera stack
33camera_auto_detect=1
34display_auto_detect=1
35
36# Config settings specific to arm64
37arm_64bit=1
38dtoverlay=dwc2
39
40[cm4]
41# Enable the USB2 outputs on the IO board (assuming your CM4 is plugged into
42# such a board)
43dtoverlay=dwc2,dr_mode=host
44
45[all]
46dtoverlay=vc4-kms-v3d
47dtoverlay=vc4-kms-dpi-hyperpixel4
48dtparam=rotate=180
49dtparam=touchscreen-inverted-x,touchscreen-inverted-y
And your cmdline.txt should look like this:
dwc_otg.lpm_enable=0 console=tty1 root=LABEL=writable rootfstype=ext4 rootwait fixrtc quiet splash
Let there be rainbows!
If you’re using the desktop edition, you’ll need a monitor plugged in for the first time setup. Not because the Hyperpixel won’t work … but because the setup daemon won’t fit on the Hyperpixel. Unfortunately this will become a bit of a theme as we explore further.
For that matter, you’ll probably want a “proper” keyboard with the desktop edition too because the on-screen keyboard is … painfully small!
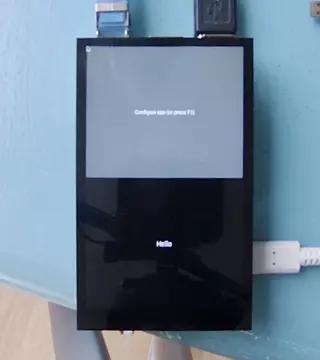
Boot up your Pi, and you should see the plymouth “whirly” loading screen appear on both the monitor and the Hyperpixel. When the initial setup window loads it will only appear on the monitor. You can try dragging it off the right edge to appear on the Hyperpixel but it won’t fit (in either portrait or landscape orientations).
Once through the initial setup, don’t detach the monitor just yet. You’ll need it to deal with the first login greeter which … also doesn’t fit (despite being mostly empty space). That said, a major plus point in Kinetic is that the Online Accounts system finally works (because the embedded webkit component was fixed). Once through the first login greeter you can now shut down the Pi, remove the monitor, and start it up again.
Note that everything in the boot-process still works, just on the Hyperpixel, from the plymouth “whirly” screen, to the login screen (where you can try the on-screen keyboard … though personally I’d recommend sticking to a “real” keyboard!), to the desktop itself.
I’d recommend firstly starting up the Settings application. Note how nicely this fits even in tiny resolution with an odd aspect ratio (well done, those developers!). Go to “Ubuntu Desktop”, and switch on “Auto-hide the dock” to get a little bit more precious horizontal space!
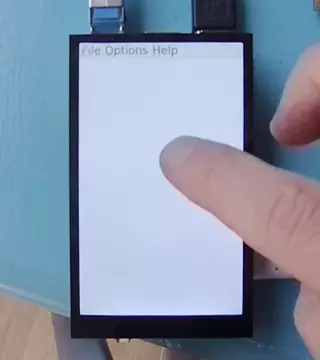
Explore around a little more, however, and you may find that this ability to reform an application to fit a small space … is far from universal. The file browser and calculator are good:
Unfortunately the application selector is effectively unreadable, and the help page falls off the edge of the screen although the help application itself does manage to maximize correctly. The Mines game, unfortunately, doesn’t (and won’t) reshape itself to the Hyperpixel:
Firefox works tolerably well though (although the Settings page also falls off the right side):
Kivy Kivy Kivy A Man …
If you’re using the server edition, you can just plug in and go but you will need a keyboard as there’s no on-screen keyboard you can use at the Linux console. You should find rotation of the screen is honoured … for now!
First of all we’ll try one of the more popular Python-based frameworks for touchscreen interfaces: Kivy. This is already in the Ubuntu archive, and so are its examples. However, we do need to make a couple of tweaks to get the most out of it:
Firstly, add the default user to the input group. Without this change, the touchscreen won’t work for console-based applications:
$ sudo adduser ubuntu input
For this to take effect, you’ll need to logout and login again (group membership is only evaluated at login time; you can use sg to switch groups but this gets confusing to follow with all the sub-shells!)
Next we install Kivy, Kivy’s examples, and the multi-touch library libmtdev1 (also necessary to take advantage of certain examples — I suspect this is a missing dependency / recommendation of the examples package):
$ sudo apt install libmtdev1 python3-kivy python-kivy-examples
Kivy installs its examples under /usr/share/kivy-examples. Feel free to browse this directory and its contents, trying things for yourself. By way of example, we’ll start with a look at Kivy’s multi-touch and basic graphics capabilities:
$ cd /usr/share/kivy-examples
$ python3 demo/pictures/main.py
$ python3 tutorials/pong/main.py
Warning
If you enabled rotation, you may note several things at this point: firstly that the screen rotation is ignored completely. And secondly that the touchscreen rotation … isn’t. Which results in some difficulty!
What about slightly more advanced rendering?
$ python3 3Drendering/main.py
$ python3 shader/plasma.py
And how about UI widgets?
$ python3 settings/main.py
I’d recommend trying other demos under /usr/share/kivy-examples, but be aware that not all of them work: some of the demos are rather out of date and require Python 2.x, others have extra dependencies, or require OS facilities or hardware that isn’t necessarily available (e.g. the Android demos). The list of demos I failed to get (reliably) running includes:
- RST_Editor/main.py
- android/*
- camera/main.py
- demo/multistroke/main.py
- frameworks/twisted/twisted_app.py
- keyboard/main.py
- kinect/kinectviewer.py
- svg/*
- widgets/actionbar.py
- widgets/colorpicker.py
- widgets/unicode_textinput.py
Furthermore, as noted above, screen rotation appears to be ignored by Kivy, but touchscreen rotation isn’t.
What a Qt!
Another popular UI framework is Qt. You may be familiar with this from the KDE desktop, but Qt is also perfectly capable of running outside a full windowing environment. This makes it an ideal framework for embedded applications as you can develop and test within the desktop, but then run the same code at the console outside the windowed environment, without the “weight” of the full desktop.
Again, you’ll need a keyboard here as there’s no on-screen keyboard in the server edition. And once again, we need a couple of tweaks and some new packages installed:
If you’re following on from the Kivy examples you’ll have done this already but just in case, add the default user to the input group. Without this change, the touchscreen won’t work for console-based applications:
$ sudo adduser ubuntu input
For this to take effect, you’ll need to logout and login again (group membership is only evaluated at login time)
Install the Qt5 examples. No need to install anything extra here; the examples are pre-compiled and the dependencies are all correct (e.g. libmtdev1 is included):
$ sudo apt install qtbase5-examples
To tell Qt that you want to render direct to the screen you need to set an environment variable:
$ export QT_QPA_PLATFORM=eglfs
The Qt documentation has more information on platform plugins for embedded devices.
Qt’s examples are stored under /usr/lib/$GNU_ARCH/qt5/examples. We’ll switch to that directory and try a simple demo that includes controls for exiting it:
$ cd /usr/lib/aarch64-linux-gnu/qt5/examples
$ ./widgets/touch/fingerpaint/fingerpaint
There are many other examples under the qt5/examples directory, but I would caution against trying them immediately. Firstly, set up SSH to your Pi from another machine. Most of the Qt examples assume they’re in a windowing environment with a convenient “Close” button on the owning window. But that’s not the case when running from the console, and unlike the Kivy examples you can’t simply Escape or Ctrl+C your way out of them. If you find yourself in a demo you can’t quit, you can either reboot with the classic Ctrl+Alt+Del shuffle, or if you have SSH set up you can login from another machine and killall on the demo you’re running.
As with Kivy, if you play around with rotation you’ll notice that screen rotation is ignored. This can be worked around by using the QT_QPA_EGLFS_ROTATION environment variable to tell Qt to handle the rotation itself but there are caveats:
- 270° rotates incorrectly for some reason (bug?)
- Rotation is anti-clockwise, the opposite direction to the overlay’s sense of rotation
Hence, if you wish the touchscreen coordinates to match you’ll need to apply opposite measures:
A strange disagreement in coordinate systems!
But rotation can be achieved with a little work
That’s all for now, folks. Have fun!